POST Views
From Career Pathways Tutorial
Due to browser compatibility issues, please use the latest version of Google Chrome or FireFox when using the Career Pathways Roadmap Web Tool.
Contents |
Introduction
POST Views is the feature where you will create the "stacked"/"mapped" view of a high school plan of study with a community college pathway.
- POST Drawings must be published in order to be added to a POST View.
- Drawings that are added to any POST View will be automatically updated when new versions are published.
- You can update a View with additional drawings, change tab names and sort orders at any time. Changes are saved automatically and will be reflected in a published view embedded in a public website.
Sample POST View
- Southwestern Oregon Community College
- Embedded on public website - Manufacturing Technology
- Lane Community College
POST Views List
To access, click POST Views from the side navigation menu.
- All Views are listed in alphabetic order by Occupation/Program title.
- Each View reflects who created and last modified the View.
- Click the
 Drawing Properties icon next to the Occupation/Program title to access embed code and/or edit an exisiting POST View.
Adding a New POST View
To access, click POST Views from the side navigation menu.
- Click
 at the top of the drawing list to create a mapped plan of study between selected high schools and community college organizations.
- Type a short and descriptive Occupation/Program title for your drawing, such as "Architectural Design & Drafting", "Business", or "Nursing".
- Please do not add your organization's abbreviation to the title.
- Your Organization name is confirmed below.
- Click

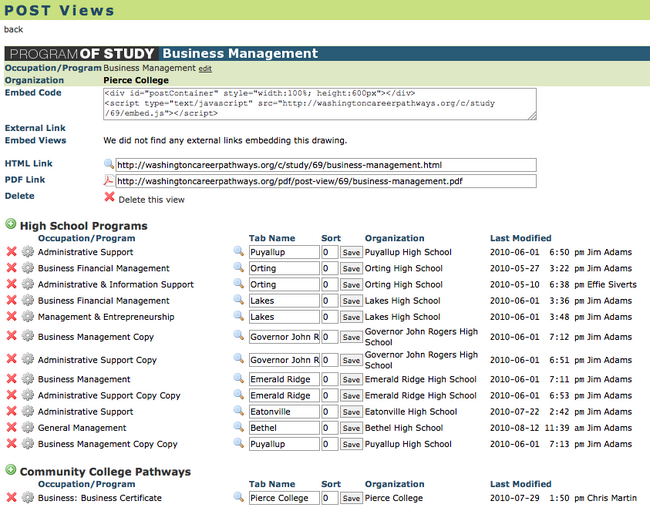
- You are now viewing the POST View setup page. From here you have access to the URL for the POST View and the Embed Code to embed it in a public website.
For tutorials on how to embed POST Views into public websites, click here: Embedding Roadmaps & POST Views
Adding Published POST Drawings
- To add a High School Program click the
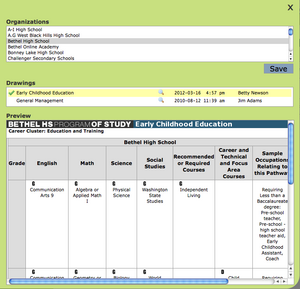
 icon to the left of the section title. A pop-up box will appear with the complete list of high schools in the Web Tool.
- Scroll through the list and select the desired high school name from the Organizations list.
- If no published drawing exists for the selected organization, the following message will appear beneath the list of organizations in the Drawings list: No published drawings were found for this school.
- If published drawings do exist for the selected high school, a list of available POST drawings will appear in the Drawings list beneath.
- To preview a drawing click the
 preview icon to the right of the drawing title – the drawing will display within the pop-up box.
- To accept the drawing, click the drawing title and a
 icon will confirm your selection, and a Save button will appear.
- Click Save to continue and return to the POST Views setup page.
- The POST View setup page will now reflect the added high school Occupation/Program. From here you can either
 delete the affiliated plan of study, or
  add another. Multiple high school POST drawings can be connected to a single community college pathway.
- Follow steps 6 – 6 above to add a Community College Pathway to this same view. Multiple community college drawings can be connected to a single POST View. For instance, if you have a certificate and an AAS degree you want to add to a POST View, this is how you would map them together.
- Changes (additions and deletions) are saved automatically.
- To review your POST View click the Preview hyperlink at the top of the setup page.
- If more than one POST drawing is added to each section they are separated by “tabs” in the published view of the drawings.
- Default tab names and tab sort orders can be overridden in the Tab Name and Sort field boxes to prioritize the display of each mapped drawing. Click Save to save changes.
Print To PDF
NOTE: Unlike embedded POST Views, PDFs will NOT display multiple tabs across the page. Tabs are separated into individual drawings for printing.
- From the
 POST Views property page page, click the
  icon located to the left of the PDF Link field.
- This will open a pop-up box allowing you to download and save a PDF of the rendered HTML POST View, to your computer.
- All hyperlinks in your POST View are active in these PDF documents.
- This PDF is automatically generated on the Web Tool server and always reflects the currently published versions of the POST Drawings included in this POST View, just like the HTML Link does!
- You can copy and paste the PDF Link URL into your website code to allow viewers to download this PDF document at any time.
Deleting POST Views
This will delete the entire POST View of "mapped" high school and community college plan of study templates.
- Click
 Drawing Properties next to the desired POST View name
- Click
 Delete this view in the middle of the screen, and
- Click Yes to confirm.
CAUTION! Please be careful! Deleting POST Views will break any external links to that View. There is no way to recover deleted Views!
For tutorials on how to embed POST Views into public websites, click here: Embedding Roadmaps & POST Views

