POST Views
From Career Pathways Tutorial
(Difference between revisions)
Sivecki (Talk | contribs)
(New page: ==Adding a New View== To access, click <b>POST Views</b> from the side navigation menu. # Click Image:NewView.png at the top of the drawing list to create a mapped plan of study betw...)
Newer edit →
(New page: ==Adding a New View== To access, click <b>POST Views</b> from the side navigation menu. # Click Image:NewView.png at the top of the drawing list to create a mapped plan of study betw...)
Newer edit →
Revision as of 11:18, 16 April 2009
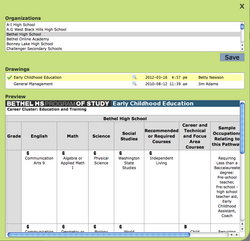
Adding a New View
To access, click POST Views from the side navigation menu.
- Click
 at the top of the drawing list to create a mapped plan of study between selected high schools and community college organizations.
- Type a short and descriptive Occupation/Program title for your drawing, such as "Architectural Design & Drafting", "Business", or "Nursing".
- Please do not add your organization's abbreviation to the title.
- Your Organization name is confirmed below.
- Click

- You are now viewing the POST View setup page. From here you have access to the URL for the POST View and the Embed Code to embed it in a public website.
- To add a High School Template click the
 icon. A pop-up box will appear with the complete list of high schools in the Web Tool.
- Scroll through the list and select the desired high school name from the Organizations list.
- If no published drawing exists for the selected organization, the following message will appear beneath the list of organizations in the Drawings list: No published drawings were found for this school.
- If published drawings do exist for the selected high school, a list of available POST drawings will appear in the Drawings list beneath.
- To preview a drawing click the
 preview icon to the right of the drawing title – the drawing will display within the pop-up box.
- To accept the drawing, click the drawing title and a
 icon will confirm your selection, and a Save button will appear.
- Click Save to continue and return to the POST Views setup page.

Embedding POST Views
- It is recommended that you embed a drawing by inserting an <iframe> tag into your website code. This will present the Roadmap drawing within the design of your website, maintaining your website navigation while students and advisors review the POST Drawing.
- You can define the height and width of the <iframe> in your website document to best fit the Roadmap, as well as modify the frameborder and scrolling options.
Here is an example of the embed code for a POST View:
<iframe width="800" height="600"
src="http://oregon.ctepathways.org/c/view_post/jg.html"
frameborder="0" scrolling="no"></iframe>
- To obtain the embed code, click on the
 Drawing Properties icon from the POST View list.
- The URL for the drawing is random and unique to this custom view, however it will always have the word "view_post" within the URL, like this:
- This is the best method of embedding a POST drawing. When a new version of a mapped POST drawing is published, the POST View will always reference the currently published version of that drawing.
NOTE: If any drawing is renamed after it has been mapped into a POST View, the POST View will error, breaking any links on external sites to this drawing. For this reason, it is a good idea never to change the names of drawings once they have been "published".