POST Views
From Career Pathways Tutorial
(→Deleting POST Views) |
|||
| Line 2: | Line 2: | ||
''Due to cross-browser issues, please use the <b>latest version of [http://www.mozilla.com/firefox/ FireFox]</b> or <b>Internet Explorer 7</b> when working in the <b>Career Pathways Roadmap Web Tool</b>:'' http://oregon.ctepathways.org | ''Due to cross-browser issues, please use the <b>latest version of [http://www.mozilla.com/firefox/ FireFox]</b> or <b>Internet Explorer 7</b> when working in the <b>Career Pathways Roadmap Web Tool</b>:'' http://oregon.ctepathways.org | ||
| - | + | __FORCETOC__ | |
==Adding a New POST View== | ==Adding a New POST View== | ||
| Line 28: | Line 28: | ||
==Deleting POST Views== | ==Deleting POST Views== | ||
| + | This will delete the entire POST View of "mapped" high school and community college plan of study templates. | ||
# Click http://oregon.ctepathways.org/common/silk/cog.png Drawing Properties next to the desired POST View name | # Click http://oregon.ctepathways.org/common/silk/cog.png Drawing Properties next to the desired POST View name | ||
# Click http://oregon.ctepathways.org/common/silk/cross.png <b>Delete this view</b> in the middle of the screen, and | # Click http://oregon.ctepathways.org/common/silk/cross.png <b>Delete this view</b> in the middle of the screen, and | ||
Revision as of 22:57, 21 April 2009
<< return to main Tutorials page...
Due to cross-browser issues, please use the latest version of FireFox or Internet Explorer 7 when working in the Career Pathways Roadmap Web Tool: http://oregon.ctepathways.org
Contents |
Adding a New POST View
To access, click POST Views from the side navigation menu.
- Click
 at the top of the drawing list to create a mapped plan of study between selected high schools and community college organizations.
- Type a short and descriptive Occupation/Program title for your drawing, such as "Architectural Design & Drafting", "Business", or "Nursing".
- Please do not add your organization's abbreviation to the title.
- Your Organization name is confirmed below.
- Click

- You are now viewing the POST View setup page. From here you have access to the URL for the POST View and the Embed Code to embed it in a public website.
- To add a High School Template click the
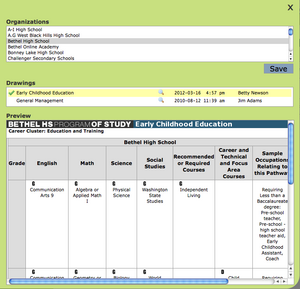
 icon. A pop-up box will appear with the complete list of high schools in the Web Tool.
- Scroll through the list and select the desired high school name from the Organizations list.
- If no published drawing exists for the selected organization, the following message will appear beneath the list of organizations in the Drawings list: No published drawings were found for this school.
- If published drawings do exist for the selected high school, a list of available POST drawings will appear in the Drawings list beneath.
- To preview a drawing click the
 preview icon to the right of the drawing title – the drawing will display within the pop-up box.
- To accept the drawing, click the drawing title and a
 icon will confirm your selection, and a Save button will appear.
- Click Save to continue and return to the POST Views setup page.
- The POST View setup page will now reflect the added high school Occupation/Program. From here you can either
 delete the affiliated plan of study, or add another. Multiple high school POST drawings can be connected to a single community college pathway.
- Follow steps 6 – 6 above to add a Community College Pathway to this same view. Multiple community college drawings can be connected to a single POST View. For instance, if you have a certificate and an AAS degree you want to add to a POST View, this is how you would map them together.
- Changes (additions and deletions) are saved automatically.
- To review your POST View click the Preview hyperlink at the top of the setup page.
- If multiple POST drawings are added to a view they are separated by “tabs” in the published display.
- Default tab names and tab sort orders can be overridden in the Tab Name and Sort field boxes provided for each mapped drawing. Click Save to save changes.

Deleting POST Views
This will delete the entire POST View of "mapped" high school and community college plan of study templates.
- Click
 Drawing Properties next to the desired POST View name
- Click Delete this view in the middle of the screen, and
- Click Yes to confirm.
CAUTION! Please be careful! Deleting views will break any external links to that drawing. There is no way to recover deleted views!
Embedding POST Views
- It is recommended that you embed a drawing by inserting an <iframe> tag into your website code. This will present the Roadmap drawing within the design of your website, maintaining your website navigation while students and advisors review the POST Drawing.
- You can define the height and width of the <iframe> in your website document to best fit the Roadmap, as well as modify the frameborder and scrolling options.
Here is an example of the embed code for a POST View:
<iframe width="800" height="600"
src="http://oregon.ctepathways.org/c/view_post/jg.html"
frameborder="0" scrolling="no"></iframe>
- To obtain the embed code, click on the Drawing Properties icon from the POST View list.
- The URL for the drawing is random and unique to this custom view, however it will always have the word "view_post" within the URL, like this:
- This is the best method of embedding a POST drawing. When a new version of a mapped POST drawing is published, the POST View will always reference the currently published version of that drawing.
NOTE: If any drawing is renamed after it has been mapped into a POST View, the POST View will error, breaking any links on external sites to this drawing. For this reason, it is a good idea never to change the names of drawings once they have been "published".