Organization POST Drawings
From Career Pathways Tutorial
(→Configure Rows & Cols) |
|||
| (82 intermediate revisions not shown) | |||
| Line 1: | Line 1: | ||
| - | + | {{BrowserNotice}} | |
| - | + | __FORCETOC__ | |
| - | + | ||
| - | + | ||
| - | + | ||
| - | |||
| - | |||
| - | |||
| - | |||
| - | |||
| - | |||
| - | |||
| - | + | ==[[The Roadmap & POST Drawing Lists|POST Drawing List]]== | |
| + | Click the above link to learn about navigating the drawing list and utilizing dynamic filter box tools to browse drawings created by all organizations in the Web Tool. | ||
| - | + | ==[[POST Drawing Properties|Drawing Properties]]== | |
| + | Here you have access to detailed information and properties settings about each POST drawing, as a whole - inclusive of all versions created for that drawing. | ||
| - | + | ==[[Version Settings|Version Settings]]== | |
| - | + | Here you have access to detailed information and properties settings specific to each Roadmap or POST Drawing version. Click the above link to access Version Notes and HTML and PDF links that will always point to each specific version. | |
| - | == | + | |
| - | + | ||
| - | + | ||
| - | + | ||
| - | + | ||
| - | + | ||
| - | + | ||
| - | + | ||
| - | + | ||
| - | + | ||
| - | + | ||
| - | + | ||
| - | + | ||
| - | + | ||
| - | + | ||
| - | + | ||
| - | + | ||
| - | + | ||
| - | + | ||
| - | + | ||
| - | + | ||
| - | + | ||
| - | + | ||
| - | + | ||
| - | + | ||
| - | + | ||
| - | + | ||
| - | + | ||
| - | + | ||
| - | + | ||
| - | + | ||
| - | + | ||
| - | + | ||
| - | + | ||
| - | + | ||
| - | + | ||
| - | + | ||
| - | + | ||
| - | + | ||
| - | + | ||
| - | + | ||
| - | + | ||
| - | + | ||
| - | + | ||
| - | + | ||
| - | + | ||
| - | + | ||
| - | + | ||
| - | + | ||
| - | + | ||
| - | + | ||
==Adding a New Drawing== | ==Adding a New Drawing== | ||
<b>Each drawing must have a unique Occupation/Program name.</b> The Web Tool stores and references each drawing by organization abbreviation and drawing Occupation/Program name. | <b>Each drawing must have a unique Occupation/Program name.</b> The Web Tool stores and references each drawing by organization abbreviation and drawing Occupation/Program name. | ||
| - | # Click [[Image: | + | # Click [[Image:AddCCPathway.png]] at the top of the drawing list to create a new POST Drawing for your Organization, or |
| + | # Click [[Image:AddHSProgram.png]] at the top of the drawing list to create a POST Drawing for an "Affiliated High School" (a High School in your local network). | ||
# Type a short and descriptive <b>Occupation/Program</b> title for your drawing, such as "Business", "Construction", or "Accounting". | # Type a short and descriptive <b>Occupation/Program</b> title for your drawing, such as "Business", "Construction", or "Accounting". | ||
#* ''Please do not add your organization's abbreviation to the title. It is automatically added by default.'' | #* ''Please do not add your organization's abbreviation to the title. It is automatically added by default.'' | ||
# Your Organization name is confirmed below. | # Your Organization name is confirmed below. | ||
| - | |||
| - | |||
# Click [[Image:Create.png]] | # Click [[Image:Create.png]] | ||
| - | # Your new drawing and ''Version 1'' has now been created. You are now viewing the drawing canvas to start | + | # Your new drawing and ''Version 1'' has now been created. You are now viewing the drawing canvas to start editing your POST Drawing. |
#* Your organization abbreviation, the Career Pathways logo, and drawing title are automatically placed in a title bar at the top of the drawing canvas. These are fixed. | #* Your organization abbreviation, the Career Pathways logo, and drawing title are automatically placed in a title bar at the top of the drawing canvas. These are fixed. | ||
| + | ==[[Importing a POST Drawings from Excel]]== | ||
| + | Click the above link to learn about using this feature to import Plan of Study Templates that have been completed in Excel. Download the Excel (.XLS) template to help with formatting data for importing. | ||
| + | ==[[Renaming POST Drawings]]== | ||
| + | Click the above link to learn how to rename your POST Drawings. | ||
| + | ==TOOLS Orientation== | ||
| + | : [[Image:POSTHelp.png|right]] | ||
| + | * View the sidebar <b>HELP</b> menu to the left of the drawing canvas for a complete list of features. | ||
| + | * Table cells, that appear {{Yellowtext|yellow}} when hovered over can be edited. | ||
| + | :*Click to edit cell content in pop-up windows. | ||
| + | * Right-click table cells for a menu of quick editing options. | ||
| + | ===Table Row Content (two options)=== | ||
| + | <b>Radio Button #1 - Course Information</b> | ||
| + | :* Presents course information in a pre-formatted content in your table. | ||
| + | :* ''IN DEVELOPMENT:'' Content added here will display as a automatically generated hyperlink. When clicked a pop-up box will provide end-users with course descriptions directly from your community college database. | ||
| + | : [[Image:CCTableCell1.png|480px]] | ||
| - | + | <b>Radio Button #2 - Course Content</b> | |
| - | + | :* A WYSIWYG (''What You See Is What You Get'') editor allows for text entry and basic formatting, including the ability to add multiple hyperlinks and spell-check, and for the HTML savvy, an HTML editor for customized CSS styles. | |
| - | + | : [[Image:EditPOSTContent.png|480px]] | |
| - | + | ||
| - | + | ||
| - | + | ||
| - | + | ||
| - | + | ||
| - | + | ||
| - | + | ||
| - | + | ||
| - | + | ||
| - | + | ||
| - | + | ||
| - | + | ||
| - | |||
| - | + | * Selected <b>legend symbols</b> will automatically display in a legend under the table. Click <b>F5</b> to refresh your screen to see changes to the current version. | |
| - | + | ||
| - | + | ===Degree Options (right-side vertical column)=== | |
| + | * Using your mouse to highlight the degree table cell in {{Yellowtext|yellow}}, click to select the appropriate degree option from a pre-determined list. | ||
| + | :: <b>Community College POST Drawing</b> | ||
| + | :: [[Image:CCDegreeOptions.png|450px]] | ||
| + | :: <b>High School POST Drawing</b> | ||
| + | :: [[Image:HSDegreeOptions.png|450px]] | ||
| - | + | ===High School Column Headings (override defaults)=== | |
| - | + | * When working on POST Drawings for [[Affiliations|Affiliated High Schools]], you can edit the default column headings. | |
| + | ::* Click on the desired column header, when it is {{Yellowtext|highlighted in yellow}}, to edit the description in a pop-up window. | ||
| + | ::* Change the text in the field provided, as desired, and click "Save" or hit ENTER on your keyboard to save and return to the drawing. | ||
| + | :: [[Image:HSHeader.png]] | ||
| + | * Defaults to high school column heading can be permanently changed by High School Administrative users only. Refer to [[High School Settings]] for more information. Changes affect only NEW drawings. | ||
| - | + | ===Quick Editing Options=== | |
| - | + | * To easily move content, click, <b>drag-and-drop</b> content from one cell to another. | |
| - | + | # Click the text, and begin dragging. | |
| + | # The original table cell will remain {{Yellowtext|highlighted in yellow}}. The text will move with your mouse and appear grey in a floating box. | ||
| + | # Drop the text into the desired <b>empty cell</b>. All content, including hyperlinks and selected legend symbols, will move with this feature. | ||
| - | + | <b>Right-click table cells to:</b> | |
| + | : [[Image:POSTQuickEdit.png|right]] | ||
| + | ====Cut==== | ||
| + | * Select http://oregon.ctepathways.org/common/silk/cut.png Cut from the menu. Content is cut from the cell. | ||
| + | * Right-click any cell (blank or with existing content) to paste the cut content. | ||
| - | + | ====Copy==== | |
| + | * Select http://oregon.ctepathways.org/common/silk/page_white_copy.png Copy to duplicate content. Content will remain in original cell copied. | ||
| + | * Right-click any cell (blank or with existing content) to paste the copied content. | ||
| - | + | ====Paste==== | |
| + | * Select http://oregon.ctepathways.org/common/silk/page_white_paste.png Paste to paste cut or copied cell content. | ||
| + | * Right-click any cell (blank or with existing content) to paste content. | ||
| - | + | ====Clear==== | |
| - | + | * Select http://oregon.ctepathways.org/common/silk/page_white_delete.png Clear to delete cell content without opening the content pop-up window. | |
| - | + | ||
| - | + | ||
| - | + | ||
| - | Configure Rows & Cols | + | ===Configure Rows & Cols=== |
| + | [[Image:RowConfig.png|250px|right]] | ||
| + | This feature allows you to '''preview changes''' to your table structure before you commit them to your drawing. | ||
| + | * Click the "<b>X</b>" or [[Image:ConfigCancel.png]] button to close the pop-up window and return to the drawing without saving changes to your table. | ||
| + | * Click the [[Image:ConfigSave.png]] button to close the pop-up window and save all configuration changes to your drawings table structure. | ||
| - | + | ====Rows in your Drawing==== | |
| - | + | * Click http://oregon.ctepathways.org/common/silk/table.png configure rows & cols from the ''TOOLS'' menu to add: | |
| - | + | :* rows for additional grade years (duplicates are allowed for additional content) | |
| - | + | :* blank or customized row titles for additional content (above or below grade years or terms). | |
| - | + | * The grey numbers in parenthesis next to the row title, for instance <b>(0)</b> or <b>(4)</b>, indicate how many table cells have content in them. | |
| - | + | ||
| - | + | ||
| - | + | ||
| - | + | =====How to Add New Rows===== | |
| - | Click the | + | * Click http://oregon.ctepathways.org/common/silk/arrow_left.png to the left of the "Add Row" option to instantly add additional rows. The "Rows in your Drawing" section will update to display the selected change. |
| + | :* To add a custom row title, type in the desired row name before clicking the green arrow | ||
| + | ::[[Image:HSAddCustomRow.png]] | ||
| + | :* Terms (1 - 16) can be added in addition to, or in place of, grade year row options. Select the desired term from the drop-down menu before clicking the green arrow | ||
| + | :: [[Image:CCAddTermRow.png]] | ||
| + | :* To add an additional grade year row, select the desired year (1 - 6) from the drop-down menu and the desired term (summer, fall, winter, spring, summer) before clicking the green arrow | ||
| + | :: [[Image:CCAddGradeRow.png]] | ||
| + | :* To add a blank row, leave the field blank and click the green arrow | ||
| + | :: [[Image:HSAddBlankRow.png]] | ||
| - | + | =====How to Delete Rows===== | |
| + | * Click http://oregon.ctepathways.org/common/silk/cross.png to delete any undesired row. | ||
| + | * ''Remember! If you accidentally delete a row that you don't mean to, click [[Image:ConfigCancel.png]] to exit the tool without saving changes, and simply return to the tool and start over.'' | ||
| - | + | =====Include header notes?===== | |
| + | * Click the checkbox to disable/enable | ||
| + | :* Unless manually deleted from the row, any existing content will stay in the header notes row and made visible or hidden depending on whether this box is checked or not. Hidden content will copy to new drawings or new versions. | ||
| + | =====Include footer notes?===== | ||
| + | * Click the checkbox to disable/enable | ||
| + | :* Unless manually deleted from the row, any existing content will stay in the footer notes row and made visible or hidden depending on whether this box is checked or not. Hidden content will copy to new drawings or new versions. | ||
| - | + | ====Columns==== | |
| + | * Click [[Image:ConfigDeleteColumn.png]] to remove columns one at a time, starting far-right. | ||
| + | * Click [[Image:ConfigAddColumn.png]] to add columns one at a time, to the far-right side of the table. | ||
| - | + | ====Block Diagram==== | |
| - | + | * All row and column changes are instantly reflected in the Block Diagram. | |
| - | + | * This feature allows you to '''preview changes''' to your table structure before you commit them to your drawing. | |
| + | * Click the "<b>X</b>" or [[Image:ConfigCancel.png]] button to close the pop-up window and return to the drawing without saving changes to your table. | ||
| + | * Click the [[Image:ConfigSave.png]] button to close the pop-up window and save all configuration changes to your drawings table structure. | ||
| - | + | ===[[POST Drawings - Headers & Footers]]=== | |
| + | Click the above link to learn how to customize free type content (e.g. program overviews, prerequisites, links to published Roadmaps, disclosures, degree credit offerings) in the header and footer rows for your POST Drawings. | ||
| - | + | ==Sample POST== | |
| - | + | Here is a screen shot of a completed <b>sample</b> POST Drawing for a Pierce College: | |
| + | : [[Image:CCPOST.png|650px]] | ||
| - | + | ==[[Deleting Drawings]]== | |
| + | <b>There is no way to recover deleted drawings!</b> Click the above title link to learn more. | ||
| - | + | ==[[Lock This Version]]== | |
| - | + | This feature is ideal when you are collaborating on a drawing, or want to compare versions without the risk of making accidental changes, and you are NOT ready to “publish”. Click the above title link to learn how! | |
| - | + | ||
| - | + | ||
| - | + | ||
| - | + | ||
| - | + | ||
| - | + | ||
| - | + | ||
| - | + | ||
| - | + | ||
| - | + | ||
| - | + | ||
| - | + | ||
| - | + | ||
| - | + | ||
| - | + | ||
| - | + | ||
| - | + | ==[[Copy This Version]]== | |
| + | For copying existing drawings as new versions or as templates for new drawings. Click the above title link to learn more! | ||
| - | Print This Version | + | ==[[POST Drawings - Print This Version|Print This Version]]== |
| + | Click the above link to learn how to render a printer-friendly version of your POST Drawing from your browsers print menu. | ||
| - | + | ==[[Print To PDF]]== | |
| - | + | PDF documents are now automatically generated on the Web Tool server and always render the currently published version of your Roadmap Drawing, just like the HTML Links do. Click the above link to learn more! | |
| - | + | ||
| - | + | ==[[Publish This Version]]== | |
| + | Published drawings are publicly accessible. If you are ready to embed or link to a drawing in a public website, click the above link to learn more! | ||
| - | + | ==[[Unpublish This Version]]== | |
| - | + | Ideal for test drawings, POST Drawings that users don't want accidentally included in POST Views or in other public websites, and for programs that are no longer being offered, but should not be deleted. Click the above title link to learn how! | |
| - | + | ||
| - | + | ||
Current revision as of 08:39, 21 December 2012
Due to browser compatibility issues, please use the latest version of Google Chrome or FireFox when using the Career Pathways Roadmap Web Tool.
POST Drawing List
Click the above link to learn about navigating the drawing list and utilizing dynamic filter box tools to browse drawings created by all organizations in the Web Tool.
Drawing Properties
Here you have access to detailed information and properties settings about each POST drawing, as a whole - inclusive of all versions created for that drawing.
Version Settings
Here you have access to detailed information and properties settings specific to each Roadmap or POST Drawing version. Click the above link to access Version Notes and HTML and PDF links that will always point to each specific version.
Adding a New Drawing
Each drawing must have a unique Occupation/Program name. The Web Tool stores and references each drawing by organization abbreviation and drawing Occupation/Program name.
- Click
 at the top of the drawing list to create a new POST Drawing for your Organization, or
- Click
 at the top of the drawing list to create a POST Drawing for an "Affiliated High School" (a High School in your local network).
- Type a short and descriptive Occupation/Program title for your drawing, such as "Business", "Construction", or "Accounting".
- Please do not add your organization's abbreviation to the title. It is automatically added by default.
- Your Organization name is confirmed below.
- Click

- Your new drawing and Version 1 has now been created. You are now viewing the drawing canvas to start editing your POST Drawing.
- Your organization abbreviation, the Career Pathways logo, and drawing title are automatically placed in a title bar at the top of the drawing canvas. These are fixed.
Importing a POST Drawings from Excel
Click the above link to learn about using this feature to import Plan of Study Templates that have been completed in Excel. Download the Excel (.XLS) template to help with formatting data for importing.
Renaming POST Drawings
Click the above link to learn how to rename your POST Drawings.
TOOLS Orientation

- View the sidebar HELP menu to the left of the drawing canvas for a complete list of features.
- Table cells, that appear yellow when hovered over can be edited.
- Click to edit cell content in pop-up windows.
- Right-click table cells for a menu of quick editing options.
Table Row Content (two options)
Radio Button #1 - Course Information
- Presents course information in a pre-formatted content in your table.
- IN DEVELOPMENT: Content added here will display as a automatically generated hyperlink. When clicked a pop-up box will provide end-users with course descriptions directly from your community college database.
-


Radio Button #2 - Course Content
- A WYSIWYG (What You See Is What You Get) editor allows for text entry and basic formatting, including the ability to add multiple hyperlinks and spell-check, and for the HTML savvy, an HTML editor for customized CSS styles.
-
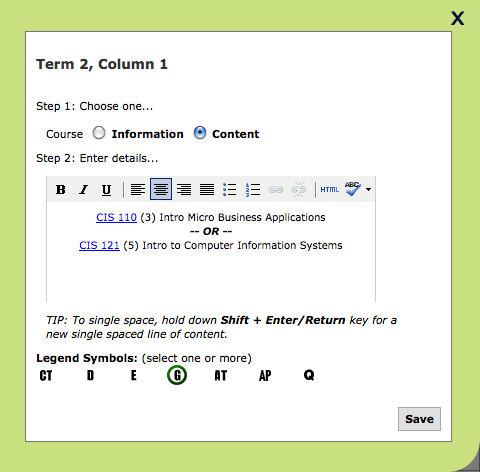

- Selected legend symbols will automatically display in a legend under the table. Click F5 to refresh your screen to see changes to the current version.
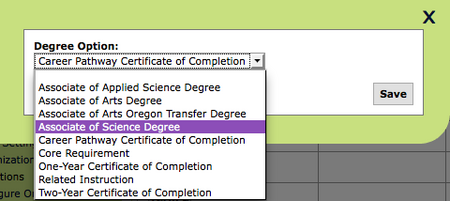
Degree Options (right-side vertical column)
- Using your mouse to highlight the degree table cell in yellow, click to select the appropriate degree option from a pre-determined list.
- Community College POST Drawing
-
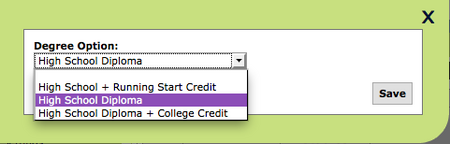
- High School POST Drawing
-


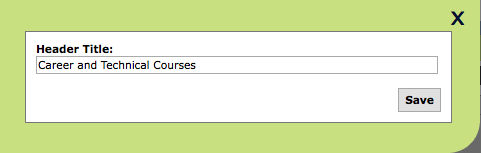
High School Column Headings (override defaults)
- When working on POST Drawings for Affiliated High Schools, you can edit the default column headings.
- Click on the desired column header, when it is highlighted in yellow, to edit the description in a pop-up window.
- Change the text in the field provided, as desired, and click "Save" or hit ENTER on your keyboard to save and return to the drawing.
-

- Defaults to high school column heading can be permanently changed by High School Administrative users only. Refer to High School Settings for more information. Changes affect only NEW drawings.
Quick Editing Options
- To easily move content, click, drag-and-drop content from one cell to another.
- Click the text, and begin dragging.
- The original table cell will remain highlighted in yellow. The text will move with your mouse and appear grey in a floating box.
- Drop the text into the desired empty cell. All content, including hyperlinks and selected legend symbols, will move with this feature.
Right-click table cells to:

Cut
- Select
 Cut from the menu. Content is cut from the cell.
- Right-click any cell (blank or with existing content) to paste the cut content.
Copy
- Select
 Copy to duplicate content. Content will remain in original cell copied.
- Right-click any cell (blank or with existing content) to paste the copied content.
Paste
- Select
 Paste to paste cut or copied cell content.
- Right-click any cell (blank or with existing content) to paste content.
Clear
- Select
 Clear to delete cell content without opening the content pop-up window.
Configure Rows & Cols

This feature allows you to preview changes to your table structure before you commit them to your drawing.
- Click the "X" or
 button to close the pop-up window and return to the drawing without saving changes to your table.
- Click the
 button to close the pop-up window and save all configuration changes to your drawings table structure.
Rows in your Drawing
- Click
 configure rows & cols from the TOOLS menu to add:
- rows for additional grade years (duplicates are allowed for additional content)
- blank or customized row titles for additional content (above or below grade years or terms).
- The grey numbers in parenthesis next to the row title, for instance (0) or (4), indicate how many table cells have content in them.
How to Add New Rows
- Click
 to the left of the "Add Row" option to instantly add additional rows. The "Rows in your Drawing" section will update to display the selected change.
- To add a custom row title, type in the desired row name before clicking the green arrow
- Terms (1 - 16) can be added in addition to, or in place of, grade year row options. Select the desired term from the drop-down menu before clicking the green arrow
- To add an additional grade year row, select the desired year (1 - 6) from the drop-down menu and the desired term (summer, fall, winter, spring, summer) before clicking the green arrow
- To add a blank row, leave the field blank and click the green arrow

How to Delete Rows
- Click
 to delete any undesired row.
- Remember! If you accidentally delete a row that you don't mean to, click to exit the tool without saving changes, and simply return to the tool and start over.
Include header notes?
- Click the checkbox to disable/enable
- Unless manually deleted from the row, any existing content will stay in the header notes row and made visible or hidden depending on whether this box is checked or not. Hidden content will copy to new drawings or new versions.
Include footer notes?
- Click the checkbox to disable/enable
- Unless manually deleted from the row, any existing content will stay in the footer notes row and made visible or hidden depending on whether this box is checked or not. Hidden content will copy to new drawings or new versions.
Columns
- Click
 to remove columns one at a time, starting far-right.
- Click
 to add columns one at a time, to the far-right side of the table.
Block Diagram
- All row and column changes are instantly reflected in the Block Diagram.
- This feature allows you to preview changes to your table structure before you commit them to your drawing.
- Click the "X" or button to close the pop-up window and return to the drawing without saving changes to your table.
- Click the button to close the pop-up window and save all configuration changes to your drawings table structure.
POST Drawings - Headers & Footers
Click the above link to learn how to customize free type content (e.g. program overviews, prerequisites, links to published Roadmaps, disclosures, degree credit offerings) in the header and footer rows for your POST Drawings.
Sample POST
Here is a screen shot of a completed sample POST Drawing for a Pierce College:

Deleting Drawings
There is no way to recover deleted drawings! Click the above title link to learn more.
Lock This Version
This feature is ideal when you are collaborating on a drawing, or want to compare versions without the risk of making accidental changes, and you are NOT ready to “publish”. Click the above title link to learn how!
Copy This Version
For copying existing drawings as new versions or as templates for new drawings. Click the above title link to learn more!
Print This Version
Click the above link to learn how to render a printer-friendly version of your POST Drawing from your browsers print menu.
Print To PDF
PDF documents are now automatically generated on the Web Tool server and always render the currently published version of your Roadmap Drawing, just like the HTML Links do. Click the above link to learn more!
Publish This Version
Published drawings are publicly accessible. If you are ready to embed or link to a drawing in a public website, click the above link to learn more!
Unpublish This Version
Ideal for test drawings, POST Drawings that users don't want accidentally included in POST Views or in other public websites, and for programs that are no longer being offered, but should not be deleted. Click the above title link to learn how!
Page Tools
Personal tools
- This page was last modified on 21 December 2012, at 08:39.
- This page has been accessed 616,283 times.